Translate

Saturday 22 March 2014

HOW TO APPLY ORACLE PSU ( 11.2.0.3) – RDBMS HOME

HOW TO APPLY ORACLE PSU ( 11.2.0.3) – RDBMS HOME

Verification
1.       Check Oracle Software version
2.       Check Os version
3.       Check patch availability
4.       Check sufficient space for Oracle Software home location
5.       Check sufficient space in /tmp
6.       Check if Inventory is working fine
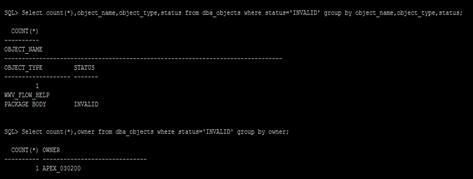
7.       Check for Invalid objects
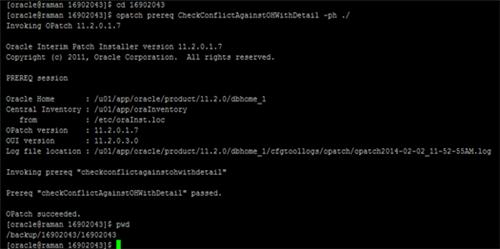
8.       Check version of Opatch
9.       Check the Read ne file for any information about the patch
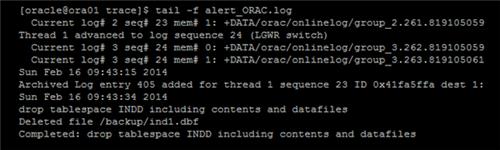
10.   Check alert log for any errors

Take 
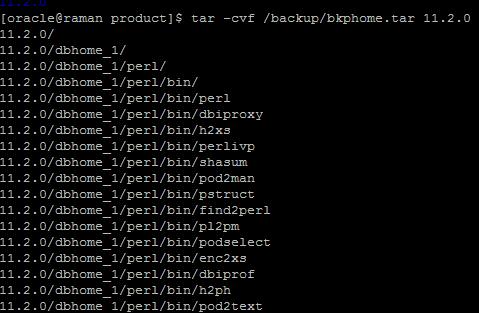
Backup of Oracle Home

1.       Database up & running -
2.       Database shutdown  - Oracle home, Oracle Inventory.

Safety : DB Backup ( Not reqd )

Select count(*),object_name,object_type,status from dba_objects where status=’INVALID’ group by object_name,object_type,status;

How to you apply oracle patches

Opatch utlity is used for applying oracle patches.

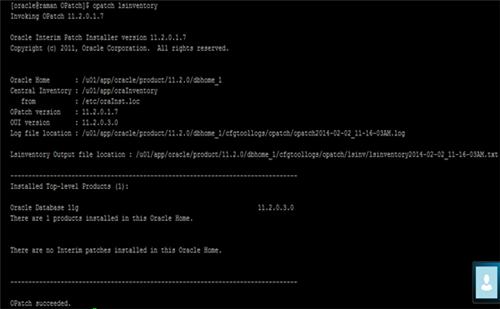
Check If Inventory is working fine/ what patches have been applied to your oracle home
Opatch lsinventory

Over All Steps

Shut db
Shut Listener
export PATH=$PATH:$ORACLE_HOME/OPatch
Cd <PATH OF YOUR PATCH>
Opatch apply
Opatch lsinventory
Start the Database
Run the recommended scripts as per README ( catbundle.sql psu apply / catcpu)
Check count of invalid objects ( Before & After )
Start Listener
Tnsping DBNAME –
Check Alert Log
Handover the Server
Opatch Location & Help


image


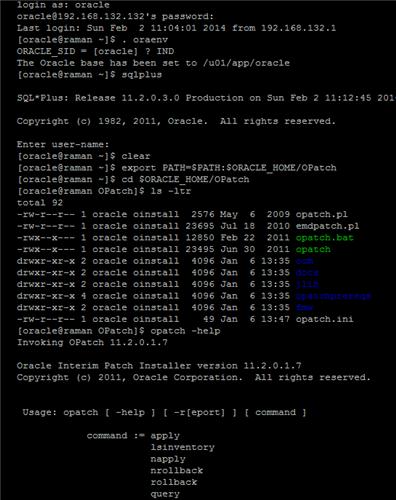
Check what patches have been applied to your oracle home

image

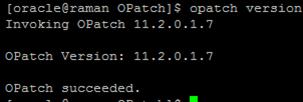
Check Opatch Version

image

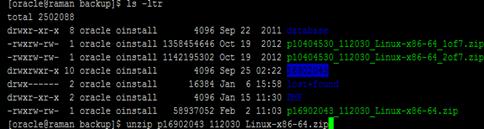
Unzip the Patch to Check Preeqs

image

image

Check Invalid Objects

image

Oracle Home Backup

image

Oracle Inventory Backup


How to upgrade Opatch Version


Move the OPatch directory to different name in $ORACLE_HOME


Apply the Patch

Check the Process


 Post Tasks


Check If patch is applied

opatch lsinventory 


Run Catbundle.sql


Check if Patch is registered in Oracle Home


Verify Invalid Object Count after Patching


Troubles shoot Scenario 1

If inventory location is commented


Here the inventory_loc is commented


 Troubleshoot Scenario 2

Move inventory.xml file and check opatch lsinventory

Inventory is corrupted


TABLESPACE POINT IN TIME RECOVERY


                            TABLESPACE POINT IN TIME RECOVERY

WHAT IS TSPITR?
ü  Tablespace point in time recovery (TSPITR) with RMAN uses a technique of cloning a primary database with the minimum physical structure required to recover a tablespace to the desired point in time.

WHAT IS THE NEW THING IN ORACLE 11GR2?

ü  Recover a dropped tablespace. Before 11gr2 TSPITR had a restriction of not being able to recover a dropped tablespace.

WHAT TSPITR DOES?
ü  Creates the auxiliary dummy instance
ü  Creates a clone control file.
ü  Restores/Recovers the SYSTEM, SYSAUX, UNDO & TABLESPACE Dropped.
ü  After recover it will make the datafile online. Later it will use the export of metada from source (TRANSPORTABLE tablespace)
ü  Later auxiliary database is shutdown & metadata is imported.
ü  Finally Datafile is brought online

OVERALL STEPS
1.       Create a Tablespace Test
2.       Create a user
3.       Create some objects
4.       Backup the database with archivelog
5.       Drop the tablespace
6.       Obtain the log sequence number from alert log
7.       Restore tablespace tablespace_name until logseq seq# auxiliary destination ‘/location’;

 IMPLEMENTATION

Create a Tablespace INDD

image

   Create a User


image


       Create some objects


image


1.       


           Backup the database with archivelog


image


         Drop the tablespace


image


             Obtain the log sequence number from alert log
                                                                                                                                                                                                                                                                                                 
image
So here we see after seq 23 tablespace has dropped. Let’s restore till sequence 24.

1.       Restore tablespace tablespace_name until logseq seq# auxiliary destination ‘/location’;


image


image


       Tablespace is available now

image


Friday 21 March 2014

BUILD YOUR OWN LINUX BOX USING VMWARE


1. Install the VMWARE WORKSTATION ( Not Covered in this post ).

2. Create a New Virtual machine

3. Click on Create a New Virtual Machine


4. Click Next. Click on the Browse Button and Select your Operating system


click Next

5. Select the location & name of your VM


click Next

6. Allocate Space for your VM. 


Click Next

7. Finalize your options


To customize choose Customize Hardware


After you customize click close.


Click Finish

8. Enterprise Linux Screen appears


Press Enter

Linux Server Boots & you get the welcome screen


toggle your keys and select skip


Press enter


At any point if you would like to return to your windows select ctrl+alt

9. Installation of Linux


Click Next


Select Yes


when the above screen pops up use the drop down list and select "Create Custom Layout"


Select Next


Click New Buttoon


Sample File System Layout

/ - 9GB
/tmp -2GB
/u01 - 10GB
/data-20GB
Swap - Depends on your Memory Allocated


Click Next


Click Next

If you want the SYSTEM to assign IPADDRESS go for DHCP


Click Next


Click Next

Enter the Root Password


Click Next


If you would like to customize by adding some package/features to your os please select the Customize Now radio button and click Next 


Click Next


Select each and every option on your left side. On your right side you get the rpm packages which will install the components that are required for your OS.


Click Optional Packages & select your optional packages.


Optional : If you want to install oracle database the below options are useful


If you are building an Oracle Box then the above options are very much useful. After selecting all the required rpms & components click close.


Click Next


Click Next


Click Next


Click Continue & Select the CD's when prompted.


When you get this screen you should select the second disc. 


Double click the CD button in Tray being displayed.


click Browse


Click ok

Note : CD button should show green button as it is seen in the above screenshot. Click ok

Similarly when it prompts for each & every CD use the same method.


Perform similar steps as you did for CD 2.


Perform similar steps as you did for CD 2.


Click Reboot 


Click Forward


Click Forward

Disable the Firewall


Click Yes 

Disable the SELinux


Click Forward & Yes


Click Forward


Click Forward

Create Users if Required


Click Forward


Click Finish

Click ok to Reboot the System


Right Click & open Terminal


Modify the Hostname


Click Network

Go to DNS tab and enter the Hotsname


Click Yes to save the Settings


Restart the Network


Open a New Terminal to view the hostname


Install VM Ware Tools for Copying files from local to Server, Changing the Display Settings.


VMWARE tools gets mounted


Copy VMWare Tools to Tmp and extract and install


tar -xvf filename

Install VMWare tools

./vmware-install.pl


Just press enter and go on until you get the below.

Note : If you get the same message for gcc then give no and proceed

Select the Screen Resolution


Install successful. 

Reboot the machine

init 6 as root user to reboot. 

Login to the Server


Server Install successful..


How to Use Putty like SSH Client to connect from  windows.

1. Download Putty

2. go to Server /sbin/ifconfig -a


ipaddress is the one which is present in eth0, eth0 being the network interface

3. Open your Putty and just enter the ip address and you can connect


Finally we have built a linux server.