
Thursday, 24 May 2018

Tuesday, 6 December 2016
Query Oracle Using Spark
Just for Testing
================
Prereqs
========
1. Install Java jdk 1.7 or later
2. Oracle Database Software & DB
3. Spark Software
Note : HDFS/Hadoop is not really required.
High Level Steps
=================
1. Make sure Oracle Database is up and running
2. Unzip the Spark Software
3. Launch the Spark in Stand alone mode
4. In the command prompt invoke the spark shell
5. Query Oracle Data from Spark Shell using JDBC
Oracle:
=======
create table spark.test (name varchar(20));
insert into spark.test values ('WELCOME TO SPARK');
commit;
Spark:
=======
java -version
export JAVA_HOME=/usr/java/jdk1.8.0_45
export PATH=$PATH:$JAVA_HOME/bin
echo $JAVA_HOME
export SPARK_CLASSPATH=/u01/app/oracle/product/12.1.0/dbhome_1/jdbc/lib/ojdbc7.jar
Start Spark:
============
cd $SPARK_HOME/sbin
./start-master.sh
./start-slave.sh spark://localhost:7077
Invoke Spark Shell:
===================
cd $SPARK_HOME/bin
val test = sqlContext.load ("jdbc", Map("url" -> "jdbc:oracle:thin:spark/spark@//localhost:1521/ORCL","dbtable" ->"test"))
test.count()
test.printSchema
test.show
Demo :
================
Prereqs
========
1. Install Java jdk 1.7 or later
2. Oracle Database Software & DB
3. Spark Software
Note : HDFS/Hadoop is not really required.
High Level Steps
=================
1. Make sure Oracle Database is up and running
2. Unzip the Spark Software
3. Launch the Spark in Stand alone mode
4. In the command prompt invoke the spark shell
5. Query Oracle Data from Spark Shell using JDBC
Oracle:
=======
create table spark.test (name varchar(20));
insert into spark.test values ('WELCOME TO SPARK');
commit;
Spark:
=======
java -version
export JAVA_HOME=/usr/java/jdk1.8.0_45
export PATH=$PATH:$JAVA_HOME/bin
echo $JAVA_HOME
export SPARK_CLASSPATH=/u01/app/oracle/product/12.1.0/dbhome_1/jdbc/lib/ojdbc7.jar
Start Spark:
============
cd $SPARK_HOME/sbin
./start-master.sh
./start-slave.sh spark://localhost:7077
Invoke Spark Shell:
===================
cd $SPARK_HOME/bin
val test = sqlContext.load ("jdbc", Map("url" -> "jdbc:oracle:thin:spark/spark@//localhost:1521/ORCL","dbtable" ->"test"))
test.count()
test.printSchema
test.show
Demo :
Tuesday, 31 March 2015
Database Caching Modes - 12c
12.1.0.2 has a new feature called Full database caching.
Caching can be of two types
1 . Default one
2. Full Database Caching
Default Database Caching
In the default mode if the cache has enough space to accommodate full database then only full database is cached .
Following information has been taken from Oracle Docs
What if we dont have space in the default caching mode?
- Smaller tables are loaded into memory only when the table size is less than 2 percent of the buffer cache size.
- For medium tables, Oracle Database analyzes the interval between the last table scan and the aging timestamp of the buffer cache.
If the size of the table reused in the last table scan is greater than the remaining buffer cache size, then the table is cached. - Large tables are typically not loaded into memory, unless if you explicitly declare the table for the KEEP buffer pool.
Full Database Caching
Force Full Database Caching Oracle Database caches the entire database in memory when the size of the database is smaller than the database buffer cache size.
All data files, including NOCACHE LOBs, are loaded into the buffer cache. This feature can drastically improve database performance when performing full table scans or accessing LOBs.
Consider using force Full Database Caching Mode in the following situations:
- The logical database size (or actual used space) is smaller than the individual buffer cache of each database instance in an Oracle RAC environment. This is applicable for non-Oracle RAC database as well.
- The logical database size is smaller than 80% of the combined buffer cache sizes of all the database instances for well-partitioned workloads (by instance access) in an Oracle RAC environment.
- The database uses SGA_TARGET or MEMORY_TARGET.
- The NOCACHE LOBs need to be cached. The NOCACHE LOBs are never cached unless force Full Database caching is used.
Demo


SGA INFORMATION


Testing:
Lets create a test table and verify how it behaves and what wait events are observed in the trace file



For the first Run

For the Second and third run

If you see that the wait event on the first run was Db file scattered Read. After the second and the third run it has totally gone and everything is read from cache.
Clone Pluggable Database - Oracle 12c
Cloning Pluggable Database in Oracle 12c
Cloning databases in versions prior to 12c was a challenge. We need to use RMAN to perform cloning. Now its made very easy using one single command.
Create pluggable database TARGET_NAME FROM SOURCE_NAME
Lets see how to clone a new database
Source Name : ORC1
Target Name : ORC3
1. We should be logged in as CDB$ROOT ( Container DB) to perform this task


2. Lets create & insert some sample data in ORCl database


3. Before cloning we need to make sure that we open the source database in READ ONLY.
This step is MANDATORY!!!!

4. Clone the Pluggable Database
Use the CREATE PLUGGABLE DATABASE FROM CLAUSE to create the clone DB


Datafiles have been created
View the Status
By default the new pluggable clone database will be in MOUNT state.

5. Post Tasks
Open the Source Database & Target Database to READ WRITE Mode
ORC1 & ORC3

6. Final Verification

Lets check if the table exists in the newly created database

Alert Log

Monday, 30 March 2015
Creating Users in Oracle 12c
User Creation - 12c
Starting from Oracle 12c there are two kinds of users.
1. Common User
2. Local User
1. Should Created as CDB$ROOT . You have the option to specify if you want to create the user in all container databases.
2. Username should be prefixed with c##
3. If we specify default tablespace, Quota etc we should ensure that they are present in PDB's as well.
1. Only local to a particular PDB
2. It will not be created in other databases.
3. We should alter the session and create the user.

CDB_USERS dictionary displays user information whether it is a common user,con_id etc.
CDB_USERS Dictionary
Connect Common User to a PDB
Even though you have granted create session to C##CHANAKYA you are not able to connect to pluggable database. Why?
This is because the user is not having create session privilege for that PDB. Make sure you use the below command to grant the privilege.
grant create session to username container=ALL;
.

Local User


Starting from Oracle 12c there are two kinds of users.
1. Common User
2. Local User
Common User
1. Should Created as CDB$ROOT . You have the option to specify if you want to create the user in all container databases.
2. Username should be prefixed with c##
3. If we specify default tablespace, Quota etc we should ensure that they are present in PDB's as well.
Local User
1. Only local to a particular PDB
2. It will not be created in other databases.
3. We should alter the session and create the user.
Common User
CDB_USERS dictionary displays user information whether it is a common user,con_id etc.

CDB_USERS Dictionary

Connect Common User to a PDB

Even though you have granted create session to C##CHANAKYA you are not able to connect to pluggable database. Why?
This is because the user is not having create session privilege for that PDB. Make sure you use the below command to grant the privilege.
grant create session to username container=ALL;
.
Local User
Now lets create a common user in PDB and check
We cannot connect to other PDB's because user is only local to that particular PDB. In our case
India user was created only in ORC2 hence we cannot connect to ORC1.
By using the CONTAINER clause we can specify in which particular PDB users should be created.
Connecting to PDB using Sqlplus
How to connect to PDB using sqlplus ?
We can connect to PDB's in 12c using two methods.
1. sqlplus username@PDBNAME
2. sqlplus username/password@HOSTNAME:portno/servicename
To connect as sys as sysdba
1. sqlplus username/password@HOSTNAME:portno/servicename
sqlplus username@PDBNAME

sqlplus username/password@HOSTNAME:portno/servicename

To connect as sys as sysdba

We can connect to PDB's in 12c using two methods.
1. sqlplus username@PDBNAME
2. sqlplus username/password@HOSTNAME:portno/servicename
To connect as sys as sysdba
1. sqlplus username/password@HOSTNAME:portno/servicename
sqlplus username@PDBNAME
sqlplus username/password@HOSTNAME:portno/servicename
To connect as sys as sysdba
Datapump and Oracle 12c PDB - ORA-39087
Datapump using PDB
If you are planning to export some data from PDB you need to make sure you have TNS entry in TNSNAMES.ORA. This is a prerequisite.
Lets now connect to PDB using expdp utility.

This is because there is no DATA_PUMP_DIRECTORY for the PDB.
Lets create a directory at the OS level and also at the DB level.

Lets test now by explicitly specifying the directory parameter.

Now the export is successful.
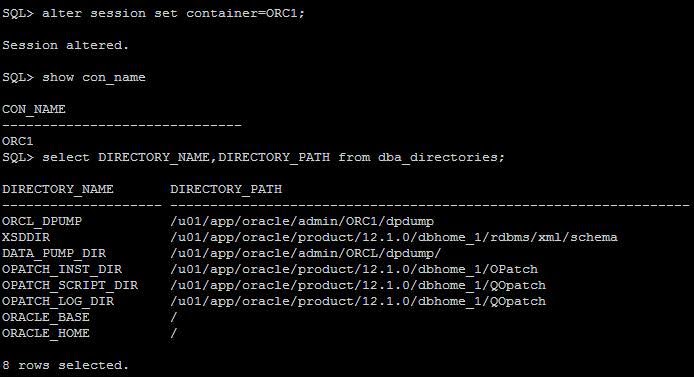
The New directory will only be displayed only in the corresponding container database.
Below screenshot will explain you the difference.

Connect to the Container database ORC1
If you are planning to export some data from PDB you need to make sure you have TNS entry in TNSNAMES.ORA. This is a prerequisite.
Lets now connect to PDB using expdp utility.
This is because there is no DATA_PUMP_DIRECTORY for the PDB.
Lets create a directory at the OS level and also at the DB level.
Lets test now by explicitly specifying the directory parameter.
Now the export is successful.
The New directory will only be displayed only in the corresponding container database.
Below screenshot will explain you the difference.
Connect to the Container database ORC1
Subscribe to:
Posts (Atom)